Showing posts with label Vegetarian. Show all posts

Monday, September 15, 2008

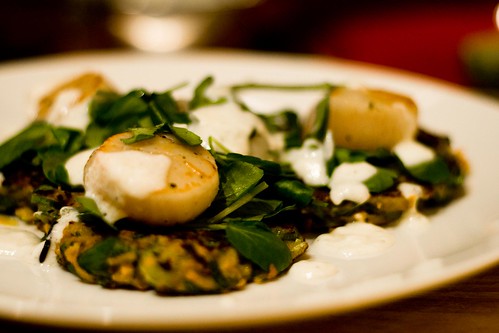
Seared Scallops with Spicy Carrot Fritters and Yoghurt Lime Dressing


With the nice weather suddenly coming back to town, I thought it was time for an interesting lighter lunch, full of flavour. i found this recipe on a BBC website from the UK. It's actually a Bill Granger though - the king of lightness and simplicity (I'm talking about his food, of course!)
This is a really simple recipe and you don't need to be an amazing cook to whip this one together in no time. My only tip would be to make sure you only cook the scallops for 1 minute on each side on a hot frypan. Any longer and you will overcook them - making them chewy.

Carrot Fritters:

60g plain flour
125ml soda water
1 egg, lightly beaten
¼ tsp ground cumin
¼ tsp ground coriander
¼ tsp turmeric
1 tsp sea salt
1 small red chilli, de-seeded and finely chopped
235g grated carrot
8 spring onions, finely sliced
25g chopped coriander
60ml vegetable oil

For Scallops:
12 medium-sized scallops, roe removed
2 tbsp olive oil
sea salt
freshly ground black pepper
watercress, to serve

For Yoghurt Dressing:
125g plain yoghurt
1 tbs lime juice
sea salt
freshly ground black pepper
1 tbs olive oil

Method:
1. Place the flour, soda water, egg, cumin, coriander, turmeric and salt in a bowl and mix well. Add the chilli, carrot, spring onion and coriander and stir to combine.
2. Heat frying pan, add oil & heat until hot. Cooking in batches, add two tablespoons of batter per fritter and cook for two minutes on each side, or until golden brown. Drain on paper towels. Cook the remaining fritter batter, adding extra oil if necessary. Place the fritters on an ovenproof plate lined with paper towels and keep warm.
3. Place the scallops in a bowl, add olive oil, season with salt and pepper and stir to combine. Heat a non-stick frying pan over a medium-to-high heat and cook the scallops for no more than one minute on each side.
4. For the yoghurt dressing, place all the ingredients in a bowl and whisk to combine.
5. Place three carrot fritters on each plate, top with the watercress and scallops and drizzle with the yoghurt dressing. Season with pepper and serve.

Saturday, June 07, 2008

Butternut Pumpkin Cupcakes

Butternut Pumpkin cupcakes may sound a little strange, but think of the other vegetables you use in cakes - Beetroot, Carrots, Zucchini, so why not Butternut Pumpkin? In fact, this recipe is very similar to a Carrot Cake recipe.

These cup cakes are so simple to make- basically you just whiz everything up in a food processor and you're ready to bake.

I have to say, these cupcakes are probably the best cakes I have ever made! I really fell in love with the sweet pumpkin cake and the zesty, sour cream icing. Give them a try!

Ingredients:

For the muffins

  • 400g butternut pumpkin, skin on, deseeded and roughly chopped
  • 350g light soft brown sugar
  • 4 large free-range or organic eggs
  • Sea salt
  • 300g plain flour, unsifted
  • 2 heaped teaspoons of baking powder
  • A handful of walnuts
  • 1 teaspoon of ground cinnamon
  • 175ml of extra virgin olive oil

For the frosted cream topping

  • Zest of 1 Orange
  • Zest of 1 lemon and juice of ½ a lemon
  • 140ml of soured cream
  • 2 heaped tablespoons of icing sugar, sifted
  • 1 vanilla pod, split lengthways and seeds scraped out
  • Optional: lavender flowers or rose petals

Method:

1. Preheat the oven to 180°C/350°F/gas 4. Line your muffin tins with paper cases.

2. Whiz the Pumpkin in a food processor until finely chopped. Add the sugar, and crack in the eggs. Add a pinch of salt, the flour, baking powder, walnuts, cinnamon and olive oil and whiz together until well beaten. You may need to pause the machine at some point to scrape the mix down the sides with a rubber spatula. Try not to overdo it with the mixing - you want to just combine everything and no more.

3. Fill the paper cases with the cake mixture. Bake in the preheated oven for 20 to 25 minutes. Check to see whether they are cooked properly by sticking a wooden skewer or a knife right into one of the cakes - if it comes out clean, they’re done. If it's a bit sticky, pop them back into the oven for a little longer. Remove from the oven and leave the cakes to cool on a wire rack.

4. As soon as the muffins are in the oven, make your runny frosted topping. Place most of the Orange zest, all the lemon zest and the lemon juice in a bowl. Add the soured cream, icing sugar and vanilla seeds and mix well. Taste and have a think about it - adjust the amount of lemon juice or icing sugar to balance the sweet and sour. Put into the fridge until your cakes have cooled down, then spoon the topping on to the cakes. Serve on a lovely plate, with the rest of the Orange zest sprinkled over. For an interesting flavour and look, a few dried lavender flowers or rose petals are fantastic.

Saturday, March 08, 2008

Orecchiette with Cherry Tomatoes and Ricotta

Last time I went to Sydney, I had this exact dish at North Bondi Italian Food. It was so good, so simple and so memorable, I decided to try to replicate it myself. This dish takes no time at all and you know what? Mine turned out better than the one I had at the restaurant. Pity my dining room doesn't look out over Bondi Beach though.


Orecchiette 320g
Cherry tomatoes 350g
Garlic clove 1
Parmesan 50g
Basil leaves 3tbs
Ex. V. olive oil 1tbs
Ricotta 200g

Method
1. Cut the tomatoes in half and squeeze out the juice and seeds. Peel and chop the garlic finely. Grate the Parmesan. Wash the basil.
2. Combine the tomatoes and garlic, season, add the oil and toss to combine. Let marinate for 15 minutes. Put the ricotta in a bowl, season and stir.
3. Cook the orecchiette in boiling salted water until al dente, then drain.
4. Gently heat the tomato mixture and add the drained orechiette, stirring gently to combine. Finally stir in the ricotta.

Serve with Parmesan.

Thursday, September 13, 2007

Homemade Baked Beans


Would you believe that I've never made or eaten Home-Made Baked Beans? I've only ever eaten those SPC things out of a Tin, which you heat up in the nuke-rowave. Aussie? Yes. Tasty? Not Really.
So, on the weekend, I found a recipe from Bill Granger's 'Everyday' book. It's not quite as quick as opening a tin, but believe me, it's much tastier and hey... everyone's into 'slow' food these days, aren't they?

Ingredients:

1 Tablespoon Olive Oil
1 Onion
100g Pancetta (leave this out for a Vegie version)
1 Garlic Clove
2 Anchovies
1 Teaspoon of Finely chopped Thyme Leaves
1/2 Teaspoon of Dried Oregano
400g Tin Chopped Tomatoes
2 x 400g Tins of Canellini or Butter Beans
Sea Salt
Freshly Ground Black Pepper

Preheat the Oven to 160c
Heat the olive oil in a large flameproof casserole over a medium heat
Add the onion and cook, stirring for 5 - 6 minutes, or until slightly crisp.
Add the garlic, anchoviews, thyme and oregano and cook, stirring for another minute.

Add the tomatoes and 125ml of water, bring to the boil and then reduce the heat to a simmer for another 10 minutes.
Stir in the beans, put a lid on the casserole and bake in the oven for 30 mins. Season with Salt and Pepper.
I added chopped flat leaf parsley at the end.
Serve on some nice Crusty bread and drizzle with some Olive Oil.

Tuesday, July 24, 2007

Amalfi Baked Lemons


After watching my Jamie's Italy DVD, and watching him wandering around the sun-drenched shores of the Amalfi Coast in Italy, I wanted a taste of summer for myself. So, I decided to test out a recipe I was thinking about making for a dinner party this weekend. In Italian, the dish is called limoni di amalfi cotti al forno, which basically translates to Baked Amalfi Lemons in English. Unfortunately, I wasn't able to track down any Amalfi Lemons (yeh... good luck!) but these lemons from Piedemonte's , which is about as Italian as they're going to get around here in Fitzroy!
The basic gist to this recipe is you cut a lemon in half and fill it with some yummy buffalo mozzarella and some other bits and pieces and bake it, so that it's all melted and oozy! The mozzarella takes on the flavour of the lemon and you spread it across some toasted Ciabatta.
Bloody delicious. And in case you were wondering.... no, you don't eat the lemon skin!!
Here's the recipe, which I found here for your cooking pleasure:


Ingredients:
  • 2 large unwaxed lemons
  • 1-2 x 150g balls of buffalo mozzarella, sliced into 0.5 cm / 1/4 inch thick pieces
  • 4 fresh basil leaves
  • 2 anchovy fillets
  • 2 ripe cherry tomatoes, halved
  • Salt and freshly ground black pepper
  • Optional: 1 dried red chilli, crumbled

Directions:
  1. Preheat your oven to 200ºC/400ºF/gas 6.
  2. Remove the ends of the lemons and discard them, then cut the lemons in half crossways, giving you 4 x 2.5cm/1 inch thick discs. See the picture opposite to see what I mean. Now, using a small knife, remove the lemon flesh leaving you with four hollow circles of skin. Basically, what we're going to do is flavour the mozzarella and push it inside the lemon skin so that it absorbs the lovely lemon flavour when it bakes.
  3. Now the mozzarella is obviously going to melt and ooze out when baked. In Italy, a lemon leaf is placed underneath each one to keep everything in place, but it's fine to use a square of greaseproof paper to do the same thing. So, lay a greaseproof paper square or a lemon leaf on a chopping board and place one of your lemon skin wheels on top. Cut a piece of mozzarella to fit inside, then lay a basil leaf, half an anchovy fillet and half a cherry tomato on top with a small pinch of salt and pepper. Add a little dried chilli if you like. Put another slice of mozzarella on top. The lemon skin should now be filled up.
  4. Do the same to the rest of the wheels, place them on a baking tray, and cook in the preheated oven for 10 to 15 minutes until golden and bubbling. Remove from the oven and allow to cool for a few minutes, then serve with some hot grilled crostini. Simply scoop the mozzarella out, eat with the toast and mop up any juices. Delicious!

Friday, July 20, 2007

Mushroom Risoni


This is the first time I'd ever used Risoni for anything other than putting into soup. I found a recipe when I was away on holidays in a cookbook that was at the house that I was staying at for Risoni which is made, kind of like Risotto. The cookbook was Two's Cooking but unfortunately, I didnt write down the recipe! I would love to give it to you, but it's pretty easy to make anyway.
Basically you sautee some mushrooms for about 5 -10 mins, until they're quite dry. cook some garlic in some butter and then put in your risoni, put in some chicken stock as per packet instructions and leave to simmer until cooked. Once cooked, stir in some parsley, butter and parmesan.
The risoni has such a silky texture in your mouth. It's much easier to make than risotto, you don't have to watch it and stir it constantly. It is very similar though to risotto at the end and I can see how some people could easily prefer risoni to risotto.

Friday, June 08, 2007

Rag Pasta with Pumpkin and Sage

This is a really great, easy pasta dish, which looks impressive and rustic all at once. It's perfect for a midweek dinner or for a vegetarian dinner party. I think the key to this recipe is to use really good instant lasagne sheets. I used Barilla and I thought they were really great. When you cook them in boiling water, they actually go quite thick.

INGREDIENTS
500g lasagne sheets
50g butter
¼ cup (60ml) extra virgin olive oil
1kg butternut pumpkin, sliced thinly
2 cloves garlic, sliced thinly
1 teaspoon fresh thyme leaves
salt and freshly ground black pepper
½ cup (40g) grated parmesan cheese
2 teaspoons fresh sage leaves


METHOD
Break the lasagne sheets into large pieces. Cook the lasagne in a large pan of boiling well-salted water until just tender. Drain, reserving 2 tablespoons of the cooking liquid.Meanwhile, heat the butter and oil in a large non-stick pan, add pumpkin; cook, stirring gently, until pumpkin is just tender. Add garlic and thyme; cook, stirring, until fragrant. Season to taste with salt and pepper.Just before serving, add cheese and sage; gently toss through pasta with the reserved cooking liquid. Sprinkle with extra Parmesan cheese flakes, if desired.

Leek, Gorgonzola and Rosemary soup

Here's a recipe I found on the BBC UK web site the other day, which I thought was a great little twist on the original Potato and Leek Soup. I love the idea of seasoning food using cheese. Blue Cheeses are quite often salty, so they make great substitutes for salt. These can be especially handy in Risotto, Pasta and of course soup. Just be careful that the stock that you use isn't seasoned before you make the soup, because this could mean your end result is over salty. Gorgonzola is a particularly salty cheese, so add it gradually and taste as you go.


Ingredients:
4 rosemary sprigs
2 tbsp olive oil
2 medium potatoes, peeled and cut into cubes
4 medium-sized leeks, sliced2 cloves of garlic, crushed
1.2 litre /2 pints hot vegetable stock
200g/7oz gorgonzola cheese, roughly chopped
½-1 tsp Dijon mustard
flaked sea salt and freshly ground black pepper
Method
1. Lightly bash the rosemary sprigs with a rolling pin to help release the powerful aroma and flavour when cooking.
2. Heat the oil in a saucepan and stir in the potatoes and rosemary. Cover with a lid and cook on a low heat for 4-5 minutes. This will create some steam in the pan, preventing the potatoes from sticking to the base. Stir in the leeks and garlic, then cook for a couple of minutes until beginning to soften. Add the stock and bring to a simmer, leaving it to cook for 10 minutes.
3. Remove from the heat, take out the rosemary sprigs and stir in the gorgonzola cheese and Dijon mustard. It doesn't matter if the cheese doesn't melt completely as you now need to place the soup into a blender or food processor and blitz until smooth.
4. Season with salt and pepper, making sure you taste the soup first as gorgonzola is quite a salty cheese. If the consistency seems too thick, add some extra vegetable stock to loosen.
5. Serve with some fresh bread while the soup is still hot - walnut bread is really nice - or if you're not eating it straight away, gently reheat, being careful not to let it boil as this will give the soup a grainy texture.

Friday, May 25, 2007

Orecchiette with Broccoli and Anchovies


Here's a famous Italian recipe, that if you haven't tried before, you should definately have a go at making. There's hardly any ingredients in it, but it has maximum flavour. Who knew that Broccoli could be so tasty! This is such a quick and easy recipe, it's perfect for midweek dinners. One word of advice though, don't use cheap and nasty Orecchiette. Use good quality, authentic Egg Pasta that you get from Italian Deli's and Supermarkets like Piedemontes. This will make all the difference to your meal.

Ingredients:

400g orecchiette
1 head broccoli, broken into small florets
2 Cloves of Garlic
1 Knob of Butter
2-3 tablespoons extra virgin olive oil
6 - 8 large anchovy fillets, chopped
Teaspoon of Dried Chilli Flakes
freshly ground black pepper
100g freshly grated Parmesan or pecorino cheese
Method:
Bring a large pot of salted water to the boil and cook the orecchiette until al dente.
About 3 minutes before the pasta is cooked, place the Broccoli in with the pasta, it wont take long to cook at all.
While the pasta and Broccoli is cooking, prepare the Broccoli and Anchovy sauce.
Heat the olive oil in a frying pan with the anchovies, mashing them with the back of a spoon.
Add your chilli and garlic and lightly fry for a few minutes until fragrant.
Add the drained Broccoli, Pasta and pepper and stir to mix and heat through.
Add the Cheese and Butter to the pasta and mix thoroughly into the hot pasta and serve immediately.

Tuesday, February 27, 2007

Pear, Pomegranate and Walnut Salad with Yarra Valley Persian Fetta


This is my twist on the old classic Pear and Walnut Salad, which, don’t get me wrong, is great, but I thought I’d try it with 2 of my favourite ingredients; Pomegranates and the deliciously creamy Yarra Valley Persian Fetta. This cheese is so smooth, it’s almost like silk, it’s marinated in various herbs and is one of my most favourite products from my beloved Yarra Valley. Give this salad a shot, it’s fantastic!

Ingredients:

1 cup of Walnut Kernals
Juice and Seeds of 1 Pomegranate
½ a Garlic Clove
Zest of 1 Lemon
125ml Extra Virgin Olive Oil
300g Rocket
2 Ripe Pears (not too soft)
150g Yarra Valley Persian Fetta or similar

Put the Walnuts, Olive Oil, Garlic, Sea Salt, Grated Lemon Zest into a blender, which will form part of the dressing for your salad.
Toss the rocket in some of your pomegranate juice and a dash of olive oil.
Core your pears and slice them thinly, a v-slicer helps with this, if your knife skills aren’t up to scratch.
Arrange the pear on a plate with your Rocket.
Crumble the Fetta in and around the Rocket and sprinkle your Pomegranate seeds over the salad.
Drizzle your Walnut dressing over the salad and you’re ready to enjoy! Nice!

Monday, December 25, 2006

Carrot and Coriander Salad

This is the easiest in the world to make, it takes no time to make and is so, so tasty!

Ingredients:
1 Carrot
1 Bunch of Coriander
Juice of 1 Orange
Olive Oil
Salt and Pepper
1 Small Chilli
Black Sesame Seeds to garnish

Method:
Finely julienne your Carrot, I like to use a Julienne grater which I picked up down at Minh Phat in Victoria St for $7


Roughly chop your Coriander.


Vigorously mix your orange juice, chopped chilli, olive oil, salt and pepper (add olive oil, salt and pepper to taste.)


Mix your Carrot and Coriander and add your dressing.
Plate up your salad and sprinkle over your sesame seeds to garnish.

Wednesday, November 15, 2006

My Pad Thai

We're two weeks out of summer here in Melbourne and it's snowing in the outer suburbs! Well, even if the weather is terrible outside, there's no reason not to eat like the sun is shining. Nothing says freshness to me more than Thai food. Tonight I was late home from work, after riding my scooter home in the rain, so I thought I'd whip up a quick Pad Thai. For those of you who don't know, Pad Thai is basically a stir fry with rice noodles, but with that familiar Thai zing.

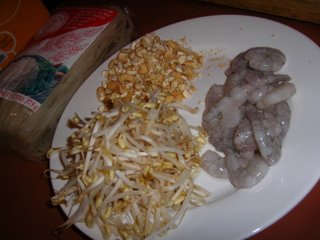
Like any good stir fry, it pays to be prepared. So get your noodles on the boil - probably about half a pack of rice stick noodles. These will take about 8 mins to cook - just enough time to cook the rest of the dish.


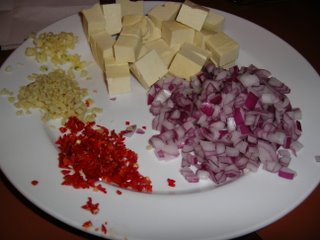
Finely chop an onion, 2 garlic cloves, a thumb size piece of ginger, and a chilli. Finely slice about 400g of pork, have about 100g of prawns peeled, crack a couple of eggs into a bowl and beat. Cut some firm tofu, about 3/4 block of stir fry tofu into blocks.


Heat up the some peanut oil in your wok and fry the eggs like an omlette, then remove and cut into strips and set aside.

Fry off some onion in the wok until softened and then add your pork. Once the pork has browned, add your garlic, chilli and ginger. Cook for another 30 seconds.


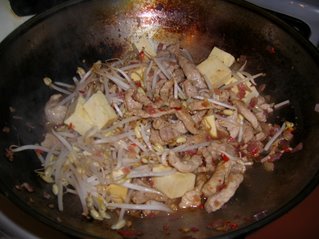
Add your prawns, bean shoots and tofu. In a bowl mix about 1/4 cup of fish sauce and 1/4 cup of lime juice with some palm sugar to sweeten. Pour this mixture into your wok. Keep tossing the food in the wok. Add your drained noodles and a couple of handfuls of chopped coriander.


Serve on a warm plate scattered with some chopped cashew nuts and some more fresh coriander.

Tuesday, October 24, 2006

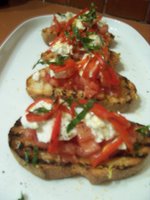
The Best Bruschetta

How good is Bruschetta? You get bread, toast it and put stuff on top. Simple as that. Anyone can make Bruschetta, it's just the quality of the ingredients that you put on top that make the difference.
Here is one of my favourites, which is great as a snack or can be eaten as a starter. Adjust the ingredients to make as many or as little as you like.

Ingredients:

Fresh Ciabatta
Ripe Tomatoes, peeled and seeded
Garlic Clove
Buffalo Mozzarella
Finely Chopped Basil
Lemon Zest
Medium Size Chillies

Method:

First place your chillies directly onto the hob of the stove, making sure you prick the skin of the chillies first, so they dont explode.
Turn the chillies until the skins are blackened all over.
Place the chillies in a small bowl and cover with glad wrap and leave for 5 - 10 mins, this will sweat the chillies and the skins will be super easy to remove.
Run the chillies under cold water and the blackened skin should basically just fall off, leaving the soft, sweet roasted flesh underneath.
It's best to split the chillies now and scrape out the seeds.
Slice this chillies thinly- longways and set aside.
Slice the ciabatta and place on a griddle pan, until you get those dark stripes that look and taste so good. (if you dont have a griddle pan, just toast under a grill)
Once toasted on both sides, cut a Garlic Clove in half and wipe it across one side of the Ciabatta.
Now smell the bread - the garlic smell will be so strong - love it!
Now you can start assembling your Bruschetta.
Start with your chopped tomatoes, then break some pieces of mozarella from the ball and place on top of the tomatoes.
Drape the chillis over the top of the cheese and sprinkle over some of the fresh basil.
Grate some lemon zest over the top of it all, drizzle some Olive Oil and season with Sea Salt and Black pepper. Easy huh?